Microservices, Eureka and Zuul Gateway User Manual - Part 3
In this section, let’s explore Spring Cloud Configuration.
Spring Cloud Configuration is a module within the Spring Cloud ecosystem that provides tools for building distributed systems and microservices applications. Spring Cloud Configuration specifically focuses on centralized and flexible management of application configurations.
1. Spring Cloud Config Serve
Firstly, we need to create a Git repository to store the configuration files.
The purpose of this is to consolidate all the configurations for the microservices in one place, making it easier for management and updates. We will create configurations for the Auth and Zuul services as follows:
auth-service.yml
security:
  jwt:
    uri: /auth/**
    header: Authorization
    prefix: Bearer
    expiration: 86400
    secret: JwtSecretKey
Similarly, follow the same approach with zuul-server.yml:
security:
  jwt:
    uri: /auth/**
    header: Authorization
    prefix: Bearer
    expiration: 86400
    secret: JwtSecretKey
Here, it’s important to note that the filename must match the name of the corresponding service, which should be the same as the value of
spring.application.namein theapplication.ymlfile. This naming consistency helps Spring map the correct configuration to each service.
The next step is to create the config-server project and use the following dependencies:
<dependency>
    <groupId>org.springframework.cloud</groupId>
    <artifactId>spring-cloud-config-server</artifactId>
</dependency>
In the main application class, use the annotation @EnableConfigServer to declare that this is a config server:
@SpringBootApplication
@EnableConfigServer
public class ConfigServiceApplication {

    public static void main(String[] args) {
        SpringApplication.run(ConfigServiceApplication.class, args);
    }

}
In the application.yml file, it should be as follows:
server:
  port: 8888
spring:
  application:
    name: config-service
  cloud:
    config:
      server:
        git:
          uri: https://github.com/cuongvndev/config-files.git
          clone-on-start: true
        #   username: xxxx
        #   password: xxxx
Here, I will store the configuration in this Git repository. Please add your username and password if needed for authorization errors.
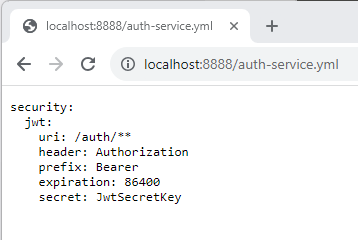
Now, if we access the URL http://localhost:8888/auth-service.yml, we will see the result as shown in the image:

2. Config Client
Next, in the Auth service and Zuul Server gateway, you will retrieve configuration information from the config server.
To achieve this, add the config-client dependency to both the Auth service and the Zuul Server:
<dependency>
    <groupId>org.springframework.cloud</groupId>
    <artifactId>spring-cloud-starter-config</artifactId>
</dependency>
- AuthServiceApplication
@SpringBootApplication
@EnableEurekaClient
@RefreshScope
public class AuthServiceApplication {
    public static void main(String[] args) {
        SpringApplication.run(AuthServiceApplication.class, args);
    }
}
- ZuulServerApplication
@SpringBootApplication
@EnableZuulProxy
@EnableEurekaClient
public class ZuulServerApplication {
    public static void main(String[] args) {
        SpringApplication.run(ZuulServerApplication.class, args);
    }
}
By using @RefreshScope on a Spring Bean, you’re instructing Spring Boot to refresh that bean when there are changes applied to the configuration (through the “Refresh Scope” mechanism). This allows you to update configuration values used by the bean without needing to restart the application.
Additionally, you need to add the Spring Cloud Config URI within the Auth and Zuul server configurations:
- Auth-service
server:
  port: 8082

eureka:
  client:
    service-url:
      defaultZone: http://localhost:8761/eureka

spring:
  application:
    name: auth-service
  cloud:
    config:
      uri: http://localhost:8888
- Zuul-server
server:
  port: 8080

zuul:
  routes:
    user-service:
      path: /user/**
      service-id: user-service
    product-service:
      path: /product/**
      service-id: product-service
    auth-service:
      path: /auth/**
      service-id: auth-service
      strip-prefix: false
      sensitive-headers: Cookie,Set-Cookie

spring:
  application:
    name: zuul-server
  cloud:
    config:
      uri: http://localhost:8888

eureka:
  client:
    serviceUrl:
      defaultZone: http://localhost:8761/eureka/
    register-with-eureka: true
    fetch-registry: true
  instance:
    prefer-ip-address: true
The configuration for the services is now complete. Next, let’s start the Auth and Zuul servers to proceed with testing!