Microservices, Eureka and Zuul Gateway User Manual - Part 1
This article provides a detailed guide on deploying and using the Microservice architecture in combination with the Eureka and Zuul Gateway tools. These steps outline the fundamentals of building a flexible and scalable distributed system.
1. Introduction
Microservices is a revolutionary software architecture model that involves breaking down applications into smaller, independent components known as “microservices.” Each microservice can be developed, deployed, and managed separately, optimizing scalability and maintenance.
Now, let’s proceed with deploying a simple system as follows:

2. Eureka server
The Eureka server is used to manage and name services, also known as a service registry. Its purpose is to provide a human-friendly way to access services without remembering their IP addresses. For example, instead of remembering the IP address 64.233.181.99, you can access Google directly using the address google.com. When services change their addresses, Eureka will automatically update the registry, eliminating the need to modify code.
Each service registers with Eureka and sends regular pings to let Eureka know it’s still operational. If Eureka doesn’t receive any pings from a service, that service will be automatically removed.
Now, let’s create a new Spring Boot project using Maven for dependency management and set up the pom.xml file as follows:
<dependencies>
    <dependency>
        <groupId>org.springframework.boot</groupId>
        <artifactId>spring-boot-starter-web</artifactId>
    </dependency>
    <dependency>
        <groupId>org.springframework.cloud</groupId>
        <artifactId>spring-cloud-starter-netflix-eureka-server</artifactId>
    </dependency>
    <dependency>
        <groupId>org.springframework.boot</groupId>
        <artifactId>spring-boot-devtools</artifactId>
        <scope>runtime</scope>
    </dependency>
    <dependency>
        <groupId>org.springframework.boot</groupId>
        <artifactId>spring-boot-starter-test</artifactId>
        <scope>test</scope>
    </dependency>
</dependencies>
Next, in the application.yml file, we need to configure it as follows:
server:
  port: 8761
spring:
  application:
    name: eureka-server
eureka:
  client:
    register-with-eureka: false
    fetch-registry: true
Finally, in the Application class, we use @EnableEurekaServer to declare that this is a Eureka Server:
@SpringBootApplication
@EnableEurekaServer
public class EurekaServerApplication {
    public static void main(String[] args) {
        SpringApplication.run(EurekaServerApplication.class, args);
    }
}
3. Zuul Gateway
Zuul is a component of the microservices system developed by Netflix. It operates as a gateway service in the microservices architecture, helping to manage and route requests from clients to corresponding microservices.
Zuul Gateway has the following main functions:
- Routing: Clients cannot send requests directly to each individual service, not to mention the communication between services. Instead, clients send requests directly to a single address of the gateway. At this point, the gateway is responsible for receiving and distributing the requests to the appropriate services.
- Load Balancing: Distributing requests to multiple instances of a service.
- Authentication and Security.
Proceed to install Zuul Gateway by creating a new Spring Boot project with the following dependencies:
        <dependency>
            <groupId>org.springframework.boot</groupId>
            <artifactId>spring-boot-starter-web</artifactId>
        </dependency>
        <dependency>
            <groupId>org.springframework.cloud</groupId>
            <artifactId>spring-cloud-starter-netflix-zuul</artifactId>
        </dependency>
        <dependency>
            <groupId>org.springframework.cloud</groupId>
            <artifactId>spring-cloud-starter-netflix-eureka-client</artifactId>
        </dependency>
Use the annotations @EnableZuulProxy and @EnableEurekaClient to declare that this is a Zuul Gateway and a Eureka Client:
@SpringBootApplication
@EnableZuulProxy
@EnableEurekaClient
public class ZuulServerApplication {
    public static void main(String[] args) {
        SpringApplication.run(ZuulServerApplication.class, args);
    }
}
And don’t forget the configuration as well:
server:
  port: 8080

zuul:
  routes:
    user-service:
      path: /user/**
      service-id: user-service
    product-service:
      path: /product/**
      service-id: product-service

spring:
  application:
    name: zuul-server

eureka:
  client:
    serviceUrl:
      defaultZone: http://localhost:8761/eureka/
    register-with-eureka: true
    fetch-registry: true
  instance:
    prefer-ip-address: true
Defining routers in Zuul informs it that when a user accesses the path /user/**, it should redirect to the user-service. , The service-id, as mentioned before, is registered by Eureka with the name “user-service” instead of using
http://localhost:8083.
4. Bussiness service
Each Eureka client service is an independent service within the microservice architecture. Each client service performs only a specific business function in the system, such as payments, accounts, notifications, authentication, configuration, etc.
User Service
Alright, similar to the Eureka Server, we will create a new Spring Boot project, but this time as a Eureka Client in the pom.xml file:
    <dependencies>
        <dependency>
            <groupId>org.springframework.boot</groupId>
            <artifactId>spring-boot-starter-web</artifactId>
        </dependency>
        <dependency>
            <groupId>org.springframework.cloud</groupId>
            <artifactId>spring-cloud-starter-netflix-eureka-client</artifactId>
        </dependency>
        <dependency>
            <groupId>org.springframework.boot</groupId>
            <artifactId>spring-boot-starter-test</artifactId>
            <scope>test</scope>
        </dependency>
    </dependencies>
In the application.yml file, we will record the address of the Eureka Server:
server:
  port: 8083
spring:
  application:
    name: user-service
eureka:
  client:
    service-url:
      defaultZone: http://localhost:8761/eureka/
After that, to let Spring Boot know that this is a Eureka client, we use the @EnableEurekaClient annotation in the main class:
@SpringBootApplication
@EnableEurekaClient
public class UserServiceApplication {
    public static void main(String[] args) {
        SpringApplication.run(UserServiceApplication.class, args);
    }
}
Proceed to create a controller for testing purposes:
- UserController.java
import org.springframework.web.bind.annotation.GetMapping;
import org.springframework.web.bind.annotation.RestController;

@RestController
public class UserController {

    @GetMapping("/user-info")
    public String getUser() {
        // Hardcode user info
        String userInfo = "Username: john_doe\nFull Name: John Doe\nEmail: john@example.com";

        return userInfo;
    }
}
Here, I will hardcode it for the sake of simplicity and convenience.
5. Testing
Great, that means we have successfully set up the framework for the microservices system. Proceed to run the services in the following order: Eureka, Zuul, and User.
To check the status of our services, visit http://localhost:8761 which is the port of the Eureka Server. Here, you will be able to see the running services as depicted in the image:

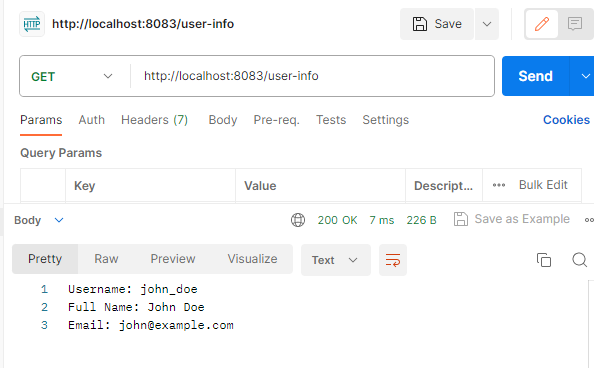
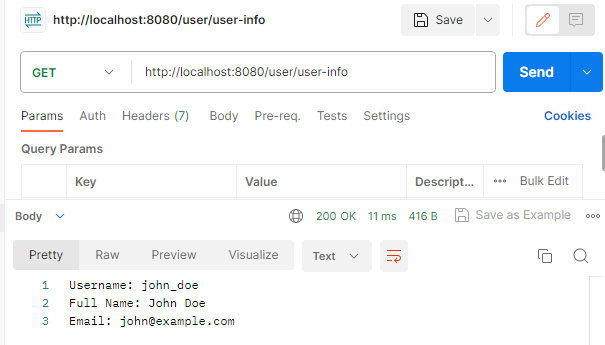
Please proceed to run the API to retrieve user information.

When calling the API
http://localhost:8083/user-info, it is being directly called to the user service on port 8083.

When calling the API
http://localhost:8080/user/user-info, it is being routed through the Zuul gateway on port 8080. The Zuul gateway will use the path /user/** to route to the user service.
This concludes the first part here. In the next section, we will delve into how to authenticate users within the microservices system and create common shared functionality across multiple services.