React Native - Redux Saga Basics
Hello everyone, in this article, I would like to share some of the knowledge I’ve gathered about Redux Saga. I hope you all find it informative.
For those who have previously delved into redux, you may be aware that between the process of dispatching an action and a reducer, we often encounter situations where an API call to the server is involved. This API call might not return results before subsequent lines of code execute, leading to undesirable outcomes. To address this, there’s a library that makes dealing with such scenarios easier - Redux Saga. (Before diving into this article, it’s recommended to have a basic understanding of redux and react).
1. What is Redux Saga?
Redux-Saga is a redux middleware library that simplifies the management of side effects in a redux application, making them more manageable and controllable.

Generator functions are capable of pausing the execution process and maintaining the context. Sounds a bit tricky, right? Put simply, a generator function can pause before it completes (unlike pure functions that execute all statements when called). It can later resume execution at a different point in time. This unique feature helps solve asynchronous issues; the function pauses and waits for asynchronous tasks to finish before continuing. For more details, you can refer to here.
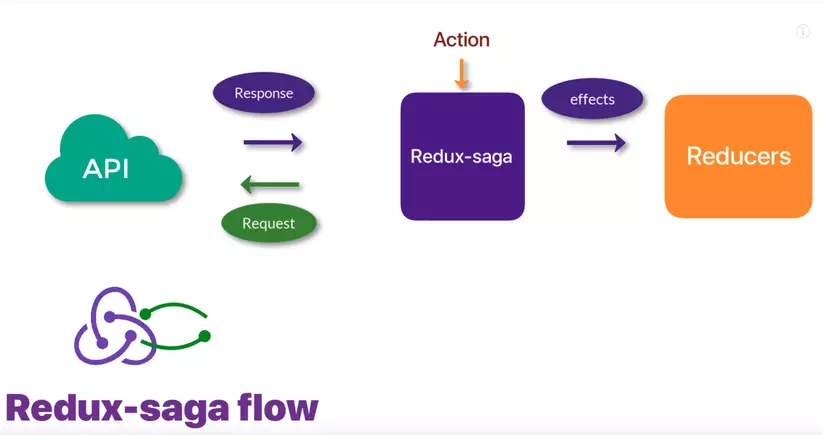
- Let’s take a look at the following diagram:

From the redux saga side, we send a request to the Server to fetch certain APIs. After obtaining the response, we use effects to handle these APIs and dispatch the necessary actions to reducers.
2. Basic Concepts of Redux Saga
Redux saga provides several methods called effects, such as:
Fork(): Uses non-blocking call mechanism on function.Call(): Calls a function. If it returns a promise, the saga pauses until the promise resolves.Take(): Pauses until a specific action is received.Put(): Used to dispatch an action.takeEvery(): Watches for a particular action and triggers a specified saga when the action occurs.akeLastest(): If a series of actions are dispatched, it will only execute and return the result of the final action.yield(): Runs sequentially, only moving to the next step after the result is obtained.Select(): Runs a selector function to retrieve data from the state.
3. Creating a React Native Project using Redux Saga
First, let’s initialize the project with the following command:
npx react-native init AwesomeApp
Make sure to install the react-native cli before running the above command.
Next, install the necessary libraries:
npm install redux
npm install redux-saga
npm install react-redux
Now, let’s create a simple counter app with buttons “+” and “-” that update the count when clicked.
The project structure should be as follows:

After initializing the project and installing relevant libraries, navigate to the file AwesomeApp/index.js to configure redux-saga in the project:
import React, {Component} from 'react';
import { AppRegistry } from 'react-native';
import {name as appName} from './app.json';
import { createStore, applyMiddleware } from 'redux';
import allReducers from './src/reducers';
import createSagaMiddleware from 'redux-saga';
import { Provider } from "react-redux";
import rootSaga from './src/sagas';
import CountrerComponent from './src/component/CountrerComponent';
const sagaMiddleware = createSagaMiddleware(); // This function is responsible for creating a middleware that sits between actions and reducers in Redux.
const store = createStore(allReducers, applyMiddleware(sagaMiddleware));

const App = () => {
    return (
        <Provider store={store}>
            <CountrerComponent></CountrerComponent>
        </Provider>
    )
}

sagaMiddleware.run(rootSaga); // This function is used to run the sagas.
AppRegistry.registerComponent(appName, ()=>App);
Now, let’s create the core components of Redux Saga: reducer, saga, and action, all within the src directory.
Actions
- actions/index.js
import { INCREMENT, DECREMENT } from "./actionType";

export const incrementAction = step =>{
    return {
        type: INCREMENT, step
    }
}

export const decrementAction = step =>{
    return {
        type: DECREMENT, step
    }
}
- action/actionType.js
export const INCREMENT = 'INCREMENT';
export const DECREMENT = 'DECREMENT';
Reducers
- reducers/counterReducer.js
import { DECREMENT, INCREMENT } from "../actions/actionType";

const initialState = {
    count: 0
};

export default function(state = initialState, action){
    console.log("Counter Reducer, " + action.step);
    switch(action.type){
        case INCREMENT:
            return {
                ...state,
                count: state.count + action.step
            }

        case DECREMENT:
            return {
                ...state,
                count: state.count - action.step
            }
        default: return initialState;
    }
}
- reducers/index.js
import { combineReducers} from 'redux';
import counterReducer from './counterReducer';

const allReducers = combineReducers({
    counterReducer
});

export default allReducers
Saga
- sagas/counterSaga.js
import { INCREMENT, DECREMENT } from "../actions/actionType";
import { takeEvery } from "redux-saga/effects";

function* increment(){
    console.log("this is increment saga");
}

function* decrement(){
    console.log("this is decrement saga");
}

export function* watchIncrement(){
    yield takeEvery(INCREMENT, increment);
}

export function* watchDecrement(){
    yield takeEvery(DECREMENT, decrement);
}
When an action with the type DECREMENT or INCREMENT is called, the decrement function will be executed, and the associated side effects will be handled within this function.
- sagas/index.js
import {all} from 'redux-saga/effects';
import {watchIncrement, watchDecrement} from './counterSaga';

export default function* rootSaga(){
yield all([
watchDecrement(), watchIncrement()
]);
}
Here, the sagas are grouped together within the all effect to run collectively.
Finally, let’s create the Counter Component:
- component/CountrerComponent.js
import React, {Component} from "react";
import {Text, View, TouchableOpacity} from 'react-native';
import { connect } from "react-redux";
import { decrementAction, incrementAction } from "../actions";

class CounterComponent extends Component {

    render(){
        const {container, conainerButton, buttonStyle, text, textStyle} = styles;
        return (
            <View style={container}>
                <View style={conainerButton}>
                    <TouchableOpacity style={buttonStyle} onPress={()=>this.props.onDecrement(1)}>
                        <Text> {"Decrement - "}</Text>
                    </TouchableOpacity>
                    <TouchableOpacity style={buttonStyle} onPress={()=>this.props.onIncrement(1)}>
                        <Text> {"Increment + "}</Text>
                    </TouchableOpacity>
                </View>
                <View style={textStyle}>
                    <Text style={text}>Count: {this.props.times}</Text>
                </View>
            </View>
        )
    }
}

const mapStateToProps = (state)=>{
  return {
      times: state.counterReducer ? state.counterReducer.count : 0
  }
}

const mapDispatchToProps = (dispatch) =>{
  return {
      onIncrement: (step)=>{
          dispatch(incrementAction(step));
      },
      onDecrement: (step)=>{
          dispatch(decrementAction(step));
      }
  }
}

export default connect(mapStateToProps, mapDispatchToProps)(CounterComponent);

const styles = {
    container: {
      flex: 1,
      backgroundColor: "#d3fee9",
      justifyContent: "center"
    },
    conainerButton: {
      flexDirection: "row",
      justifyContent: "center"
    },
    buttonStyle: {
      height: 50,
      backgroundColor: "#8846a4",
      margin: 24,
      alignItems: "center",
      justifyContent: "center",
      padding: 16,
      borderRadius: 5
    },
    textStyle: {
      alignItems: "center"
    },
    text: {
      color: "#111499",
      fontSize: 20
    }
  };
Advantages
- Separating side effects from actions makes testing easier compared to Redux-Thunk.
- Keeps actions purely synchronous following redux standards and eliminates traditional JavaScript callbacks.
Disadvantages
- Functions cannot be written as arrow functions.
- Requires understanding of Generator functions and concepts in the saga pattern.
Conclusion
The above information provides a glimpse into the components of Redux Saga that I’ve explored. I sincerely appreciate any feedback or suggestions from all of you. Thank you for following along with my article.